Fantastic Battles AAR: The Rebellion of the Blue Duke.
"The victory in the east for the High King gave him prestige unparalleled, but dissent was brewing in the home provinces. In the spring the High King sped home to face a rebellious duke: The Blue Duke. This lord of the coast stood up in revolt against the High King. He felt his domains and those of his friends on the coast overtaxed and overlevied by the High King. The Host of the High King and the army of the Rebel Duke would meet at a village dominated by two castles.

So we finally played another game of fantastic battles because I managed to finish another army. Apparently it took me a year! This new army is commanded by the Blue Duke and is based on the Dutch provinces in the medieval period, which mostly used infantry. The armies we deployed are down below.
High Kings host [red] played by Merijn:
1x General, The High King [G]
3x Royal captains [CP]
4x Companies of Knights deployed in a single brigade [K]
1x General, The High King [G]
3x Royal captains [CP]
4x Companies of Knights deployed in a single brigade [K]
3x companies of foot knights [FK]
3x companies of halberdiers, 2 deployed in a single brigade [H]
3x companies of pikemen deployed in a single brigade [P]
3x companies of crossbowmen [C]
1x company of horse archers [HA]
1x company of Reiters [R]
1x company of handgunners [H2]
1x battery of artillery [C4]
Blue Dukes Army [blue] played by Barend
1x General, The Blue Duke [BD]
4x Royal Captains [BL, FC, BC, BL]
2x Companies of Knights deployed in a single brigade [K]
2x companies of foot knights [FK]
3x companies of halberdiers deployed in a single brigade [H]
4x companies of billmen deployed in a single brigade [B]
3x companies of pikemen deployed in a single brigade [P]
3x companies of longbowmen deployed in a single brigade [L]
4x companies of Lowlander skirmishers [LS]
2x companies of Lowlander Chosen [LC]

Initial deployment at the start of the battle.

An overview of the battlefield.
Both armies start the battle fully deployed. The High King positions his artillery in a position that dominates all approaches to the blue castle. It will hurt the Dukes men during the whole battle, shooting at everything that comes within his reach. Most of the heavy elements in the High Kings army are deployed on the left flank, ready to skirt around the village and threaten the ducal right. The Duke has gone with a more general deployment, with large units spread out across his starting area.

The Royal artillery deploys with its guard.

The ducal army deployed for battle.
The Dukes army suffers heavily from dysentry, and some large units like the billmen and the pikemen take a long time to start moving forward. This gave the Royal army some initiative in maneuvering.

The first couple of turns combined. The artillery consolidates it position while all other units advance.

Ducal pikes ready for anything.

The third - fifth turn.

Birds-eye view of the opening of the battle.
Most of the Royal army swung round the castle in a manoeuvre to deny the rebels any position inside the village. The speed of the Royal advance made this not just a possibility but a major advantage for the King.

Sixth turn.

Ducal knights prepare to strike the Royal artillery.

Overview of the battlefield. Ducal infantry advancing on the right.
The sixth turn saw the first ranged attacks, horse archers started harassing the ducal right flank, hoping to make the job for the knights easier. Flanking the ducal infantry was easy for the nimble riders, the infantry had a very hard time responding.

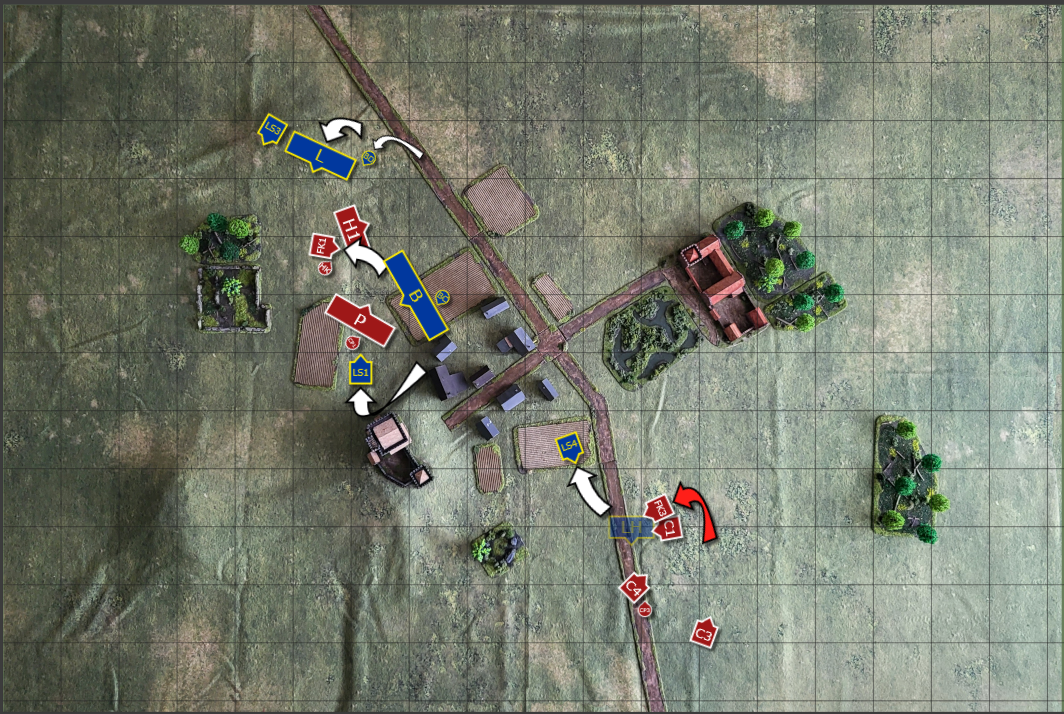
On the seventh turn the knights charge! A large clash looms at the edge of the village.

The Royal hammer strikes the halberdiers on the dukes flank. While inflicting chaos and death on the ranks of the halberdiers the attack was not as succesful as the High King expected it to be, and the Halberdiers managed to damage the knights in turn. The yellow knight led the charge, fighting furiously.

Charges on all fronts. Infantry clashes in the centre, cavalry continues to charge on the flank.
A hail of gunfire breaks the ducal foot knights, who were sent to menace the Royal cannon and it's defenders. The Royal handgunners finished them the weakened foot knights off with steady volleys of their firelocks.

Ducal units advance on every side of the battlefield. Skirmishing lowlanders destroy royal crossbowmen in the village and take up position to pour missile fire into the Royal pikes. The Royal knights were forced to retreat after unsuccesfully charging the ducal longbows.
.jpg)
Foot knights charge the Royal cavalry, this charge will break the Royal cavalry and dent the prestige of the King. The knights were his favourite and most effective fighting force. This marked a huge victory for the Blue Duke, no other general had managed to break the Royal knights in the past.

Lowlander skirmishers perform a flanking maneuver on the extreme right of the duke's line, squashing the Royal horse archers between them and the longbows.

The ducal blue/yellow knights had to face the cannonballs of the Royal artillery for many volleys. They were so weakened a lucky strike by Royal foot knights broke their backs before even arriving at their objective.

Lowland heavy infantry charges the companies guarding the artillery. These lowlanders are unstoppable on the charge and pack a real punch with their long blades.

Infantry fights continue in the fields near the village. Footknights charge into the ducal lines and wreck havoc, softening the large infantry formations up with their deadly poleaxes. The Green Knight sent these brave knights forward. The ducal foot knights facing the reiters on the hill are repulsed. The reiters are intimidating to the foot knights, shredding their thick armour with aimed fire, breaking the foot knights.


Furious fighting in the center. Pikemen on both sides brace for contact. Ducal pikemen fall under the histerical hacking of the Royal halberds. The grand Duke rides in support of his halberdiers.

The High King strikes back. Royal successes all over the place.

Ducal pikemen cower in fear of the Royal halberdiers. The High King rides in support and the halberdiers charge forward with elan. The pikes break, the fancy captain does not manage to get them back in line.

The Lowlander Chosen charged a company of halberdiers and wiped them from the face of the earth. The foot knights in this picture would later charge the lowlanders during the next turn, and managed to break them. Alas, the furious bluster and confidence of their attack was clearly short lived, for when the lowerlanders were countercharged they were swiftly defeated.
The battle ends, both armies are at their breaking point and can't continue. The Duke has to retreat and think very carefully about any further steps. The High King retreats into his own demesne and starts raising a new army, to try and destroy the rebellion for good.

Comments
Post a Comment